


by John Browne, on Nov 29, 2018 6:02:00 AM
Note: this is part 2 of a four part series. If you stumbled in here from the street, here's part 1 to help get you oriented.
If you want to follow along, you can download the code here.
What's Docker?
Docker, in case you've been hanging out in a deep-water submersible with no internet connection for the past year, is a set of tools to create, manage, and run containers. What, you may ask, are containers? I truly have no idea, but I refer you to this Wikipedia article, which is fairly confusing. I like to think of them as lightweight virtual machines, except that they're not, actually, virtual machines. But from a standpoint of application hosting, they are similar to VMs...you can set them up as autonomous units with their own OS and app infrastructure--they can run inside any host (so you could have a Linux container running in Windows, or vice versa)--and they can access network ports, so you can get in and out. Unlike VMs, containers can spool up very quickly to make it easier to scale up or scale down a workload. And--perhaps best of all--you can build and run them on your desktop, then just move the whole lashup to a different host (like AWS, Azure, or a private datacenter) without worrying about something in the config script that breaks it. If it runs locally, it will run remotely.
It's helpful to keep in mind that a container differs from a VM in that it (the container) only loads the bare minimum to do the job you've asked it for. When you set up a VM, you have, somewhat obviously, an entire (virtual) machine at your disposal. You have a complete OS with all its available services, all the I/O of the machine, full network stack--everything.
But in a container, you only load what you need. So you don't get a full OS, only a kernel. You only get the OS services that have been provided in that kernel--for example, no UI framework. It's intended to be super lightweight, quick loading, and robust from external attacks (you can't exploit what isn't there). For that reason, you have to be thoughtful about what you use as a base image (typically the kernel) to ensure you get all the services you actually need. Of course, some additional necessary services might be installable as part of the container build step.
Docker for Windows
Docker was initially created exclusively for Linux, and relied on a number of Linux bits and pieces. However, since 2014 Microsoft has been steadily embracing both containers as a concept and Docker as a solution. We're going to use Docker for Windows in this demo/tutorial to containerize an ASP.NET Core web application.
Basic workflow
For this demo, we're going to start with an ASP.NET Core web application--our cannonball WebMAP demo app--and run it in Docker. The app uses ASP.NET Core running inside .NET Framework, with Angular 6-based client/front end. You can learn all about the unique, simplified architecture we have pioneered here.
Here are the steps we'll walk through:
- Install Docker for Windows
- Enable Docker support on Visual Studio
- Create a dockerfile in our application
- Publish the app
- Build the container instance with the published app
- Run the container and verify the app
- Push the container instance to Azure to run it from the cloud
Install Docker for Windows
Before we can use Docker we have to install it. Since we are running on Windows, we need to get the Docker Community Edition (CE) from the Docker Store. To install it you need Windows 10 64-bit Pro, Enterprise, or Education. Sorry, it won't run on Windows 10 Home. And here's where I hit my first hiccup: I have VMware Workstation on my laptop. Docker uses Hyper-V (Microsoft's hypervisor) and VMWare doesn't. And you can't have two hypervisors in Windows at the same time. So to run Docker you will have to go into the Windows settings and turn on Hyper-V, but then you can't run VMWare VMs. Note: there are some home-grown solutions like a boot option. Or running Docker for Windows in a VMWare VM, which kind of makes my head want to explode.Google is your friend for this one.
You can set Docker to start automatically or just when you need it. Note it is a Windows Service, so you will find it in the system tray.
To begin, you really only need to do two things:
- Right click the Docker icon and select Windows containers (the default is Linux). To run a Linux container, you'll need to switch back. You can only run one kind of container at a time.
- Fire up PowerShell and start using Docker CLI commands. We'll get into that shortly.
Enable Visual Studio support for Docker
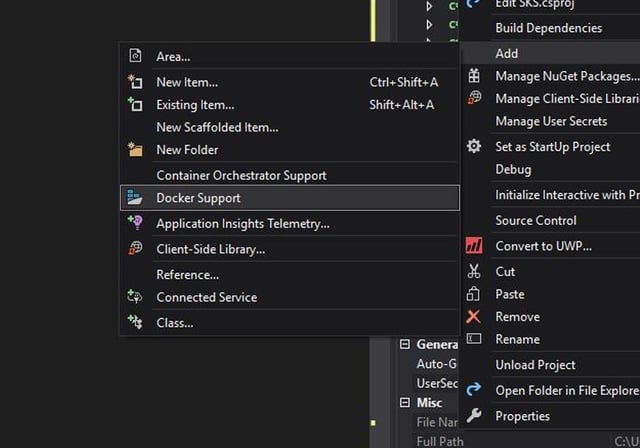
You can add Docker support for existing apps via the Add... context menu item on any VS project.
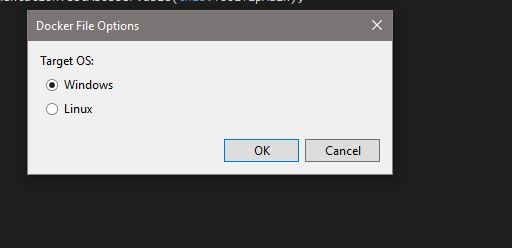
We have to choose between Windows and Linux.
When we do this for our example ASP.NET Core web app, we get exactly two changes: a new file ("Dockerfile") and a .dockerignore file (which we don't need to worry about). Let's look at the Dockerfile:
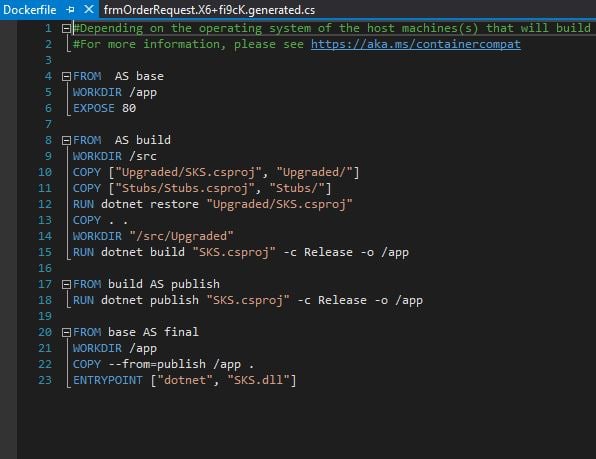
Now this dockerfile is basically useless. For one thing, it doesn't specify a base image--the necessary OS elements that are needed to run our container. Note that Microsoft understands this--there are too many options for Visual Studio to know what base image you will need, so the comment points us to this web address, which unfortunately isn't any help either. Microsoft has put a large number of images on the docker hub, but it can be tricky to figure out which one to use. Basically you make a guess, build your container, and see if it works. If not, try a different base image.
The real Dockerfile
To get our SKS demo app to run in a container, we will need ASP.NET and Windows Server Core. After some work by one of my more brilliant colleagues, we found that this base image works well:
FROM microsoft/aspnet:windowsservercore-10.0.14393.693
When we use the Docker Build command, Docker will begin by pulling this image from the Docker hub--this can take some time initially because it's a large image. Here's our dockerfile that will build a container where SKS can run:
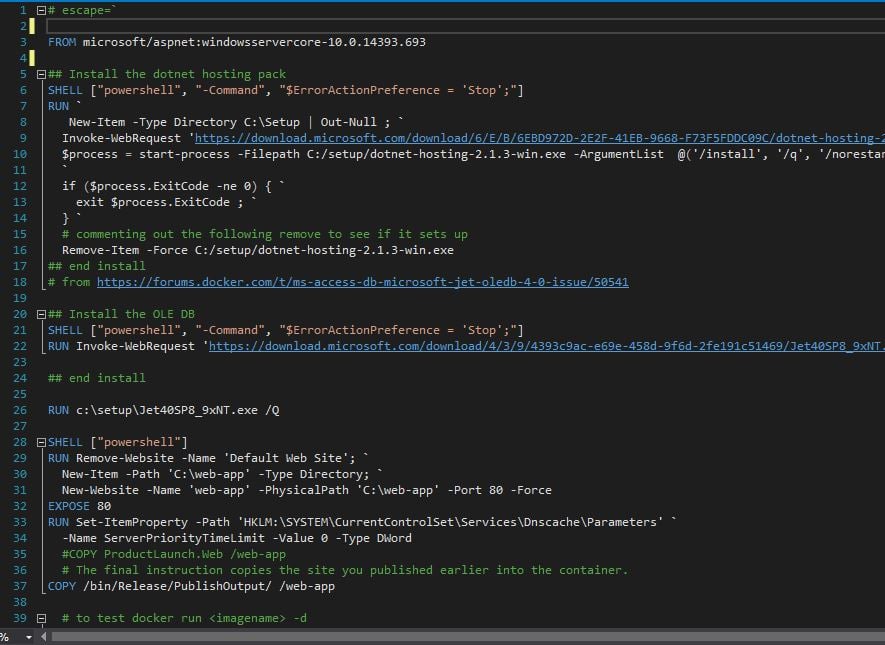
The full capabilities and syntax of a Docker file are, as they say, beyond the scope of this article. Instead, here are a couple of notes:
- escape=` means we are using the ` character as a line-continuation or escape character. Docker uses the / character as escape by default, so every slash used as a path name would have to be escaped (ie /bin/Release would have to be //bin//Release). Instead we use ` so we can specify /bin/Release. Confused yet?
- Notice we can invoke PowerShell and run PS commands. This is pretty useful. When you see the file names and paths, bear in mind those refer to the container's file system, not the physical hard drive on your hosting machine.
- Dockerfile commands are shown in UPPERCASE by convention. Notice we only use a few: FROM, SHELL, RUN, EXPOSE, COPY. Most of these are self-explanatory; "EXPOSE 80" opens Port 80 for our HTTP use with our app. You could expose any port you want--again, you are opening a port on the container, not on your host device.
Where does my app go?
Although it can be done, we're not using Docker to compile and build our application. Normally that is done on a build server after a commit and successful test run. Then the resulting app--following a successful build--is published to a hosting site. We're going to follow a similar workflow: the app is in Visual Studio, where I will build it on my laptop. But at the end of the build, let's have Visual Studio publish the app to a specific location, in this case [my working directory]\bin\release\publishoutput. That way the final step in our Dockerfile can copy all the contents of that directory to the /web-app directory in the container.
Next: Build and run
Part 3 of this series will show how we can build the container and then run the app locally.
