


by John Browne, on Nov 29, 2018 6:02:00 AM
(Note: this is the part 3 in a four part series--if you're just starting here I would urge you to go back to Part 1 and 2 and read them first.
Ok, let's recap briefly.
We know what Docker is: a container engine. And we know containers are a super-lightweight, self-contained, and portable way to run apps. And we know we tell Docker what to do with a dockerfile.
Building our image
Notice I didn't write "building our app." Although you can run a compiler--and thus a build step--inside a container, it's not really a normal approach. As I said earlier, the usual workflow is to automate the build and release cycle on a dedicated build server (a key part of CI/CD). The "build" we're doing here is building an image of our app that can run inside a Docker container.
Docker has a command line interface (CLI) available from PowerShell. Once you've ensured that Docker for Windows is actually running (check the system tray), you can start a PS session and start typing Docker commands. You can always type Docker --help and get a list of all the available commands, and for each command you can get a little more detailed help, like with Docker build --help to get help on the build command. But for more indepth information you'll have to go to the official documentation, or get a copy of Elton Stoneman's excellent book Docker on Windows: From 101 to production with Docker on Windows, available from the publisher or Amazon.com.
Each build fetches the base images you have specified in the dockerfile, and if necessary unpacks and runs installers specified in the base image. A Docker image is typically about 10GB, so you can spend quite a bit of time downloading the initial parts for your first build. However, when you have gone through that once you can modify your build options and even your dockerfile without having to download the same pieces again. Of course, if you change your base image, you may find yourself waiting for large downloads all over again.
Let's build our image for SKS. First, we have to set the current path in our PS instance to wherever the dockerfile for this app is. In this case it's in [appname]\upgraded. The command we will use is
docker build -t web-app:latest .
The -t switch tells Docker that we want to use a name for this image, basically a name for the image we can refer to. The format is name:tag, where the tag is optional. In this case the image name (tag) is web-app, although it could be anything we want it to be. The :latest tag is optional and used to clarify which version of the app is in the container (consider things like "stable," "nightly," or "bug-infested.") Finally, the "." at the end tells Docker to use the current directory as the context for the image.
When we run the build command, Docker processes all the steps in the dockerfile, starting with the FROM and ending with the COPY. As you'll see from the output, it lets you know how the progress is going.
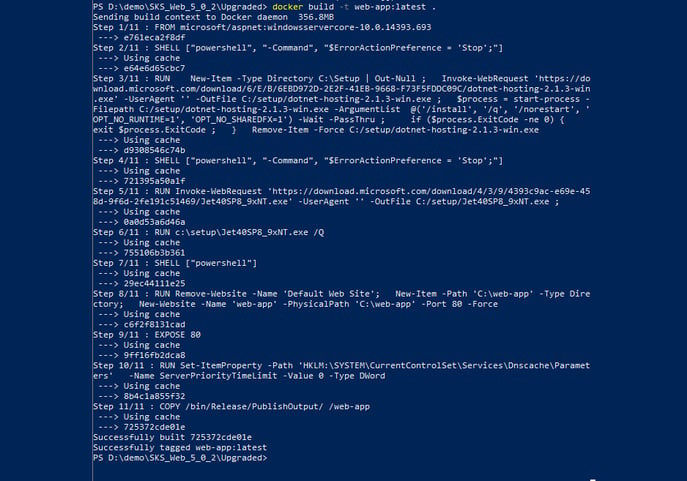
This build was fast, but the first time it was slow, because downloading and installing the windowsservercore image takes awhile. Take a nap, practice juggling, or just do something else. It will be a minute.
If the build doesn't work, check the steps to see where it failed, then go fix your dockerfile and try again.
Checking and running our image
We can make sure the build was good by running the Docker images command:
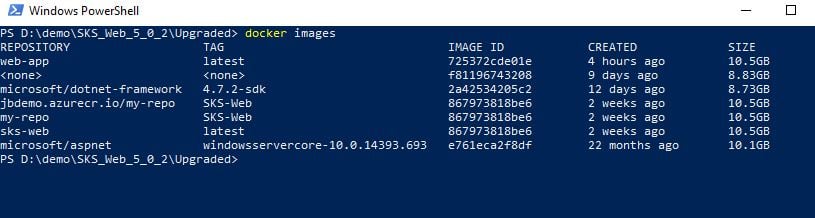
Notice the first line--this is the image we just built. Ignore the rest--they are other images I have created in the past. Notice that each one is about 10GB of disk space--they will stick around on your hard drive until you remove them with the docker system prune command or the docker rmi [image] command.
So we have our image, so what? Well, now we run it, a step which will cause Docker to create a new container and execute the image within the container. Let's do it:
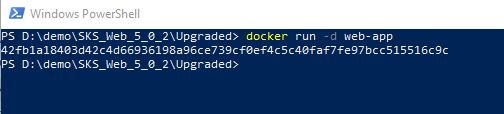
Hmm, that was kind of anticlimatic. The relevant parts of the command are the -d switch (which says to run the container in the background and print out the container ID) and the image name (7253). If you look at the screenshot from the docker images command, above, you'll see the image ID is 725372cde01e. We can usually get docker to act on an image by specifying just enough of that value to be unique. In this case "72" threw an error, but "7253" was enough to let Docker know what image I wanted to run. Go figure.
We can now verify that the container is alive and running with the docker ps command:

This command lists all running containers. If you've been messing around with Docker for awhile, try docker ps -a which will list ALL containers:
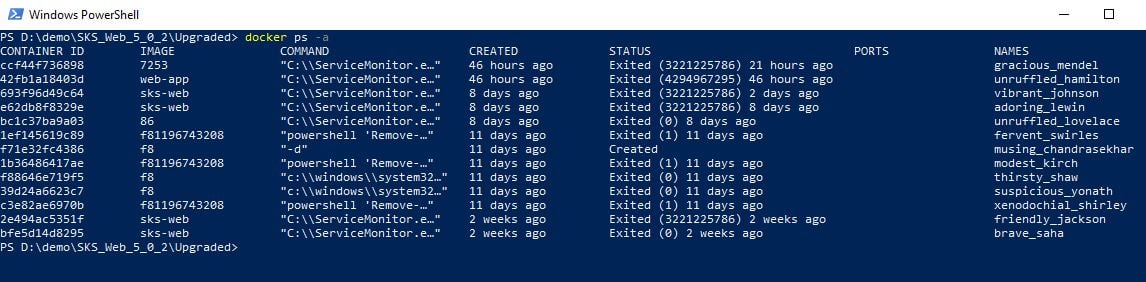
What's useful here is the the column PORTS (80/tcp) and NAMES (gracious_mendel). We can access our container via good old TCP port 80, and get information about it using the name gracious_mendel (I'm delighted by the algorithm for naming containers, as it uses a random adjective and the name of a famous scientist. This one immediately took me back to a genetics class at university, putting fruit fly generations to sleep with chloroform to look at them under a microscope.)
Small detour
I'm writing this paragraph a day after writing the above one. So look what happens:
docker inspect gracious_mendel
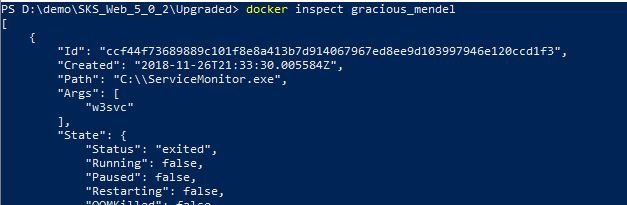
Notice under State that Running is "false" and "status" is "exited." Last night I shut down the container with a docker stop command.
If I try to start it, I can't--at least not with the old name:

The name gracious_mendel applied to a running instance of the container. Once I stop the container, that name won't work anymore. I have to use the image name to start it, and I will get a new instance name (in this case "sleepy_bartik"). Goodbye Gregor:

Let's inspect this instance:
docker inspect sleepy_bartik

You can see that this one may be sleepy but it's also running. The docker inspect command provides a ton of information from some XML data. You can use go templates to do interesting things with it. What I want at the minute is the public IP address to access it via TCP port 80. Here's a go template to print the IP address:

and it will print
172.19.209.167

I want some fish
Hey, I have an app for that. Let's type our IP address into a browser:
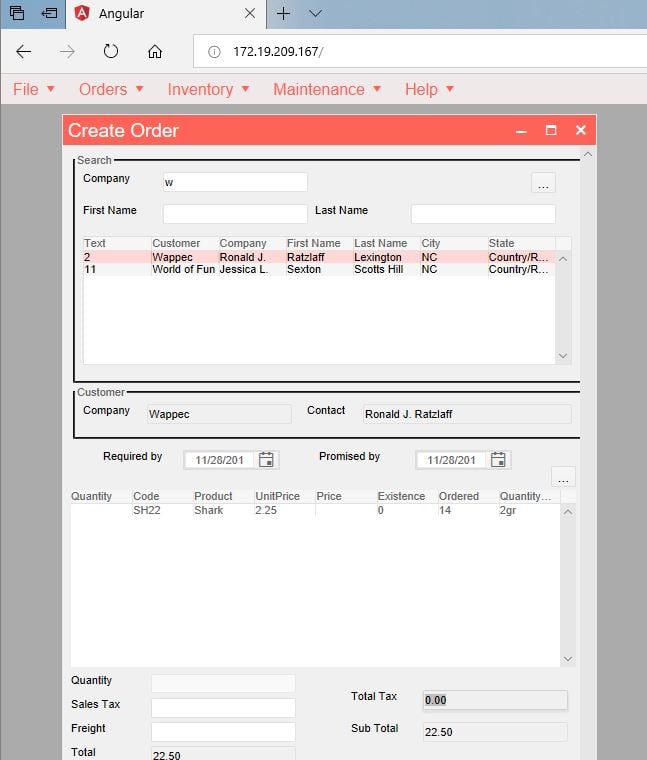
Ok, it works. Here's our Salmon King Seafood order form running as a web app in Chrome, talking to the IP address of our container.
Summary
Let's review what we're seeing here. Some people like to think of a Docker container as a private file system. I like to think of it as a super lightweight VM, kind of like the JVM. Either way, we created a container with a Windows server kernel, then piled on some .NET framework stuff and our application assembly (including the wwwroot stuff which contains the client side goodies). The container opens a port and exposes an IP address which we can determine by inspecting the container. And, since the container has an open port (80), we can access that from any browser that can physically ping the port. Because I've done all of this on my Windows 10 laptop, I can run my SKS app in Chrome locally.
Which really solves nothing. However, the great wonderfulness of containers is that I can put that container on a server where the app is accessible to anyone I want to access it. And I don't have to worry about configuration, publish scripts, nada, because a container is a container. So I know once I move the container to, say, Azure, it will work exactly like it does on my Windows 10 laptop. So let's get going.
