


by Mauricio Rojas, on Jun 8, 2020 2:48:25 PM
I had a .NET Core application that relied on Windows Authentication, and I wanted to deploy it using Docker.
Why? Well, I hate those "It worked on my computer" situations but it does not work on other environments, and I also wanted to exercise my Docker muscles.
So, lets get started.
For this post, I am using a very simple app. In my case I created a folder sampleAppWithWindowsAuth. Ran dotnet new webapp --auth Windows inside that folder. I added a web.config file to enable Windows authentication. After that, I only needed to run dotnet publish. When it was built, I copied the publish to the folder with the Dockerfile.
Now the app was ready. Next step the Dockerfile.
I started googling and found some information but not exactly what I needed so I started my own docker.
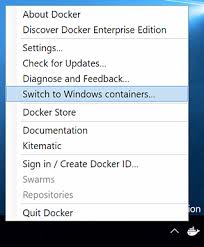
The first step was switching my Docker Desktop environment to use Windows Containers, because I wanted to use Windows Authentication. As a matter of fact Windows Authentication can also run with Linux container but I also wanted to use IIS.
When I started my Desktop Environment was a Windows 10 1709, and I had a lot of issues. So you need to have either:
- Windows 10 1809 or later (for example I have version 1909)
- Window Server 2016 or later
If you are unsure about your windows version you can use (Get-ItemProperty -Path "HKLM:\SOFTWARE\Microsoft\Windows NT\CurrentVersion" -Name ReleaseId).ReleaseId to get your version.
My initial docker started with this:
# escape=`
FROM mcr.microsoft.com/windows/servercore/iis:latest
SHELL ["powershell", "-Command", "$ErrorActionPreference = 'Stop'; $ProgressPreference = 'Continue'; $verbosePreference='Continue';"]
The
escapeis just for the powershell commands.
The SHELL is used to specify how commands are executed. For example if I have a
RUN Write-Host hellocommand with the previousSHELLinstructions that means that the command will get executed as:powershell -Command Write-Host hello ;$ErrorActionPreference = 'Stop'; $ProgressPreference = 'Continue'; $verbosePreference='Continue'
At this point a had a docker base on Window Server Core + IIS.
At some point i had some issue with powershell, it seems like I needed to enable TLS. If it happens to you, you can issue this command:
[Net.ServicePointManager]::SecurityProtocol = [Net.SecurityProtocolType]::Tls12
This sample is for Windows Authentication and that is Window Features. So the Install-WindowsFeature Web-Server; is the quite obvious cmdlet to use. I added these lines:
# Enable Windows Authentication
RUN Install-WindowsFeature Web-Windows-Auth
Next I needed to install the .NET Core Hosting Bundle in order to support running a .NET Core App in IIS
I found these lines to do that:
# Install .NET Core
ENV DOTNET_VERSION 3.1.4
ENV DOTNET_DOWNLOAD_URL https://download.visualstudio.microsoft.com/download/pr/5bed16f2-fd1a-4027-bee3-3d6a1b5844cc/dd22ca2820fadb57fd5378e1763d27cd/dotnet-hosting-$DOTNET_VERSION-win.exe

ENV DOTNET_DOWNLOAD_SHA c4efac485e527240dc0e5b806eb1d06bf70d22193d68090a17f68d09806275214bf23450385fb71e725a2eed8b09c3e91cb582979678186f66a6cb563e5688c0
RUN Invoke-WebRequest $Env:DOTNET_DOWNLOAD_URL -OutFile WindowsHosting.exe; `
    if ((Get-FileHash WindowsHosting.exe -Algorithm sha512).Hash -ne $Env:DOTNET_DOWNLOAD_SHA) { `
        Write-Host 'CHECKSUM VERIFICATION FAILED!'; `
        exit 1; `
    }; `
    Start-Process "./WindowsHosting.exe" '/install /quiet /norestart' -Wait; `
    Remove-Item -Force -Recurse 'C:\ProgramData\Package Cache\*'; `
    Remove-Item -Force -Recurse C:\Windows\Installer\*; `
    Remove-Item -Force WindowsHosting.exe

RUN setx /M PATH $($Env:PATH + ';' + $Env:ProgramFiles + '\dotnet')
# Enable detection of running in a container
ENV DOTNET_RUNNING_IN_CONTAINER=true
Which in general:
- Download the .NET Core Hosting Bundle
- Check the Download Hash
- Run the installer
- And the remove it
At this point my container was almost ready. But I needed to setup the IIS so I could host my app. Instead of using the Default Application Pool, I prefer to delete and use my own.
RUN Remove-Website -Name 'Default Web Site'; `
    New-WebAppPool -Name 'webapp'; `
    Set-ItemProperty IIS:\AppPools\webapp -Name managedRuntimeVersion -Value ''; `
    Set-ItemProperty IIS:\AppPools\webapp -Name enable32BitAppOnWin64 -Value 0; `
    Set-ItemProperty IIS:\AppPools\webapp -Name processModel -value @{identitytype='ApplicationPoolIdentity'}; `
    New-Website -Name 'webapp' `
                -Port 80 -PhysicalPath 'C:\webapp' `
                -ApplicationPool 'webapp' -force;  `
    & $env:windir\system32\inetsrv\appcmd.exe unlock config -section:system.webServer/security/authentication/windowsAuthentication;  `
    & $env:windir\system32\inetsrv\appcmd.exe unlock config -section:system.webServer/security/authentication/anonymousAuthentication
In my initial attempts I found that I needed to unlock the authentication sections to allow setting up Windows Authentication, which are those two last lines.
And finally I needed to copy my app (which I have previously published and copied to a folder along my docker file)
# Create a directory for the webapp and copy it
RUN mkdir c:\webapp
COPY .\published\ C:\webapp
Now lets build it:
docker build -t orellabac:WinAuthContainer .
Ok, now the image is ready. But are we ready now ?
Well almost. To run a docker container with Windows Authentication you need a gMSAAccount.
And I was!! 
I looked up in microsoft docs and it general these accounts are system accounts that are used for System services like IIS but they are handled in a way that they are not compromised.
So I just asked my IT Dept to create one for me. Lets stay it was WebApp01.
Once they created it, I needed to start using it on my environment.
In windows 10 the first task is to install the RSAT tools.
There are tools for managing roles and features that run on Windows Server.
Run an elevated powershell prompt and run:
PS C:\Windows\system32> Add-WindowsCapability -Online -Name 'Rsat.ActiveDirectory.DS-LDS.Tools~~~~0.0.1.0'
When I did that I got an error message:
Add-WindowsCapability : Add-WindowsCapability failed. Error code = 0x800f0954
At line:1 char:1
+ Add-WindowsCapability -Online -Name 'Rsat.ActiveDirectory.DS-LDS.Tool ...
+ ~~~~~~~~~~~~~~~~~~~~~~~~~~~~~~~~~~~~~~~~~~~~~~~~~~~~~~~~~~~~~~~~~~~~~
    + CategoryInfo          : NotSpecified: (:) [Add-WindowsCapability], COMException
    + FullyQualifiedErrorId : Microsoft.Dism.Commands.AddWindowsCapabilityCommand
I then used the solution from this guy: https://www.prajwaldesai.com/rsat-tools-installation-error-0x800f0954/
After installing the RSAT tools, you need you check your gMSAAccount. If you run
Test-ADServiceAccount WebApp01
it should return: true
Next you need to install it:
Install-ADServiceAccount -Identity WebApp01$
Next you need a credential spec:
A credential spec file is a JSON document that contains metadata about the gMSA account(s) you want a container to use.
Install-Module CredentialSpec
You might get asked to install a newer version of nuget. I just accepted all.
Next you need to create your credential spec:
New-CredentialSpec -AccountName WebApp01
It will show an output like:
Name                          Path
----                          ----
domain_account.json C:\ProgramData\Docker\CredentialSpecs\domain_account.json
You can list later your credential specs with Get-CredentialSpec
At this point you are ready.
You can now run your app with:
docker run --security-opt "credentialspec=file://artinsoft_webapp01.json" --hostname webapp01 -p 80:80 orellabac:WinAuthContainerAnd it should look like:
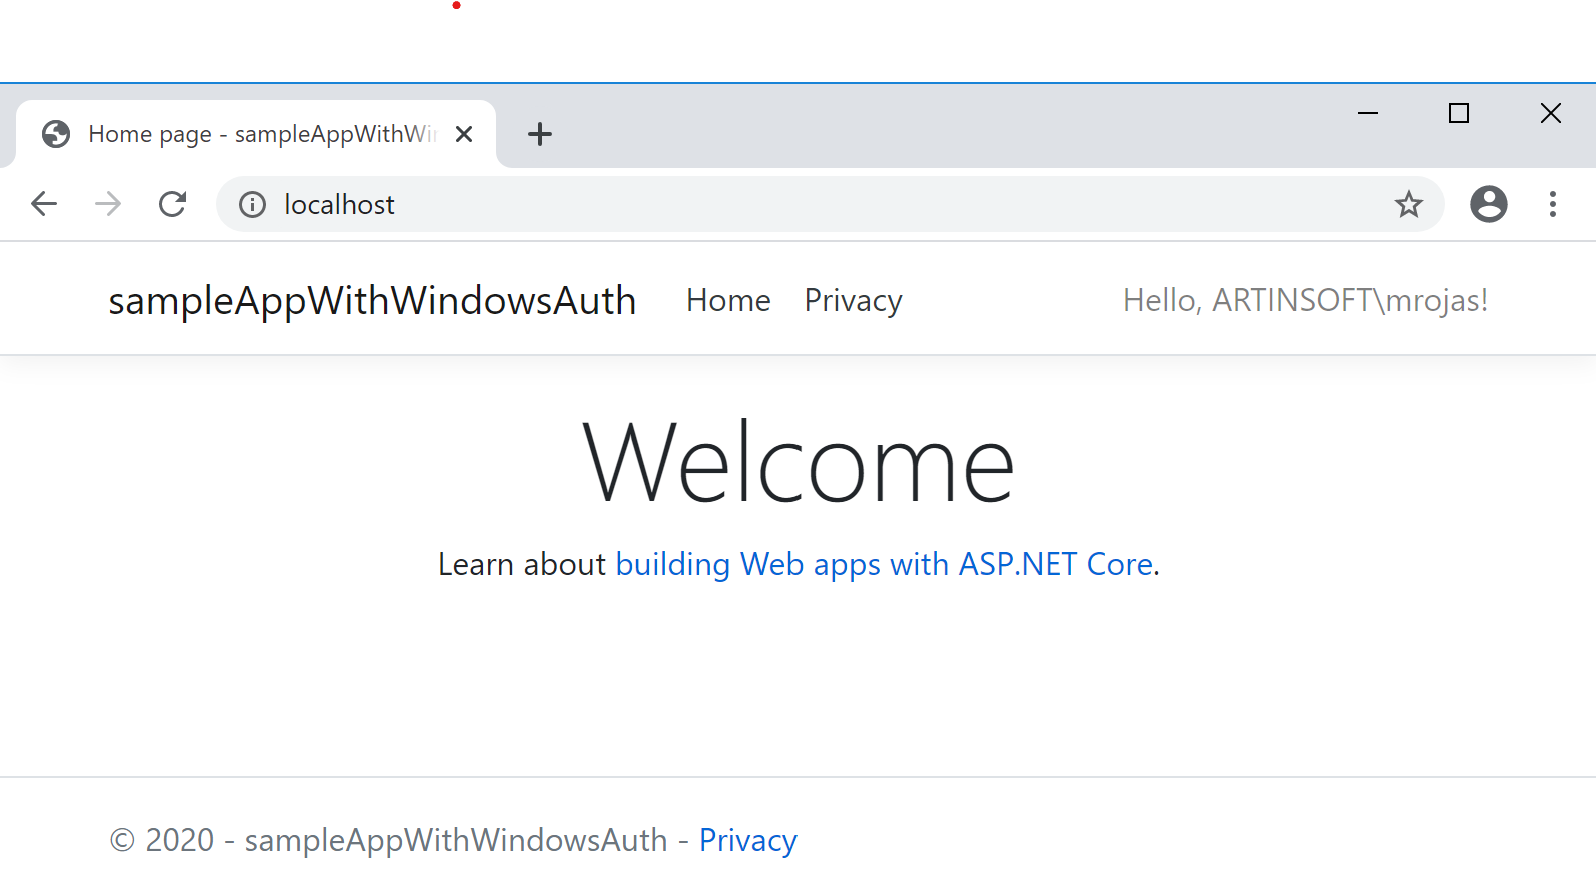
As you can see in the top corner, It shows my user name.
In case you want to test this yourself you can download the code from: https://github.com/MobilizeNet/DockerWithWindowsAuthentication
