


by Jose Chacon Bogarin, on Apr 12, 2022 10:36:05 AM
With the surge of Snowflake and its pay-for-what-you-use cloud Data Warehouse solution, more and more companies are looking to migrate their existing data warehouses into Snowflake. This has two main challenges:
- Migrating their existing code--database, schemas, and pipelines--to Snowflake.
- Migrating the actual data into Snowflake.
Mobilize.Net SnowConvert for Oracle helps companies with the first challenge by understanding and migrating your Oracle code into Snowflake code, allowing companies to save time, money, and effort by avoiding a completely manual migration.
For the second task, we have developed a solution that allows for either a complete, one-time full migration or an on-going incremental data migration from an Oracle database into Snowflake. This will be detailed in this article. There is also sample code published in our GitHub page that is in direct support of the process described in this article. Use it as a companion to this guide.
Solution Overview
Let's take a look at how you can solve this problem with an AWS Cloud instance as well as a Snowflake account. The following image is the general architecture of the solution and the main direction of the data flow:
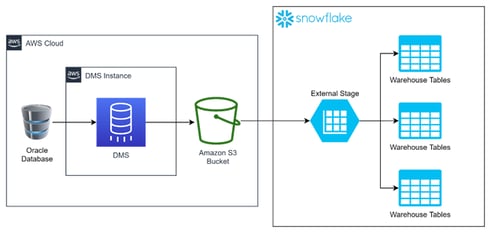
Tracking from left to right, the data starts flowing from the Oracle Source Database, through an S3 bucket, into an external stage, and finally arriving at the warehouse tables in Snowflake. This is done by the interaction of the following components:
- AWS:
- Oracle Database: the source database for the migration. This is called within the DMS as the source endpoint.
- DMS (AWS Database Migration Service): an AWS service focused on the migration of databases. It migrates data from a variety of databases, such as Oracle, SQL Server, MySQL, PostgreSQL, and others towards those same databases or into S3 buckets.
- Amazon S3 Bucket: the bucket where the migrated data will be saved. This is called within the DMS as the target endpoint.
- Snowflake:
- External Stage: the Snowflake component used to get data from external sources such as AWS S3 buckets, GCP Storage, or Azure BLOB storage.
- Warehouse Tables: the tables in Snowflake that serve as the final destination for the data.
Migration Execution Overview
Before diving into the details, let's take a high level look at how these components work, and how the data is moved from each stage to the next.
At the very beginning, the DMS will query all tables specified during the DMS configuration (this will be explained later). All this data will be saved into the S3 bucket with the following folder structure:
S3 Bucket > database_path > database_name > schema_name > table_name > LOADxxxxxx.csv
For incremental loads, the DMS will start reading from the database logs to check for all changes that have been happening in the database. The DMS will get changes every 5, 10, 60, 120, etc. seconds, depending on how it was configured. These changes will be saved into the same table location with a format of yyyymmdd-HHmissfffff.csv.
On the Snowflake side, the stage can easily query data from within the bucket location configured to it. This solution expects the stage to be configured at the location of the database_name, meaning that a single stage can query any table within the bucket. At this point, a task will execute either a COPY INTO (full load) or a MERGE command (incremental load) to the warehouse tables.
Snowflake Solution Details
On the Snowflake side, in order to get the data from the Amazon S3 bucket, there's some configuration required in Snowflake. Let's take a closer look.
Architecture
This is the architecture of the solution on Snowflake:
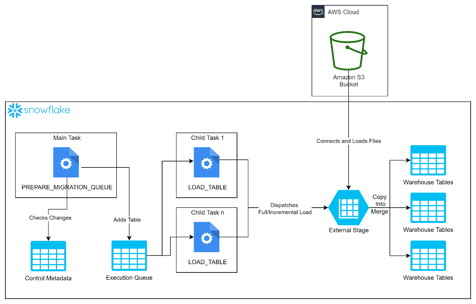
The solution is comprised of the following objects:
- Tables:
- DMS_METADATA: the table that contains metadata for all tables. This includes data about the table, its location within the bucket, the last time it was fully loaded, and the last time an incremental file was processed as well as its primary key.
- EXECUTION_QUEUE: the table that contains the list of all tables that must be loaded within the execution of the main task.
- Procedures:
- FILL_DMS_METADATA: a procedure executed manually that fills the
DMS_METADATAtable with data gathered from querying the stage files. - PREPARE_MIGRATION_QUEUE: a procedure that checks if there are updates for tables within the bucket. If there are, a message will be inserted into the
EXECUTION_QUEUEtable to let the tasks know that the table must be loaded. - LOAD_TABLE: a procedure executed by the tasks which queries the
EXECUTION_QUEUEand dispatches the execution to eitherFULL_LOAD,INCREMENTAL_LOAD, or both depending on the changes registered for the table. - FULL_LOAD: this will truncate the table and execute a
COPY INTOcommand to the table. - INCREMENTAL_LOAD: a procedure that queries the latest data from the stage based on the latest incremental file registered on the
DMS_METADTAtable. It will determine the latest state of that data to create aMERGEstatement into the target table.
- FILL_DMS_METADATA: a procedure executed manually that fills the
- Tasks:
- MAIN_TASK: the main task executes the
PREPARE_MIGRATION_QUEUEprocedure to fill theEXECUTION_QUEUEtable. - CHILD_TASK_N: calls the
LOAD_TABLEprocedure to dispatch the execution of the table to the desired process.
- MAIN_TASK: the main task executes the
Execution
After making the necessary configuration for the stage, file format, filling metadata and configuring primary keys, the execution process is as follows:
- The
MAIN_TASKwill execute thePREPARE_MIGRATION_QUEUEprocedure, which will compare the latest execution date and the last full load date file for each table. It will also compare the last processed incremental file with the latest file in the bucket to determine which tables need to be loaded. If a table needs to be loaded, this procedure inserts a record into theEXECUTION_QUEUEwith a flag (F, I, or B) indicating if it's a full load, an incremental load or both. After analyzing all tables, it will assign each table a number, which will reference theCHILD_TASKin charge of executing that table. - After finishing the
MAIN_TASK, theCHILD_TASKSwill start by executing theLOAD_TABLEprocedure. Each child task executes theLOAD_TABLEwith a different parameter. This parameter is the child task number, and it will query theEXECUTION_QUEUEbased on this value. This procedure will get one record from theEXECUTION_QUEUEand execute the procedureFULL_LOAD,INCREMENTAL_LOAD,or both depending on the load type. This process repeats until theEXECUTION_QUEUEis empty. - After the
EXECUTION_QUEUEis empty, all tables should now be updated.
Merge & Query strategy explanation
DMS file structure
The DMS has a particular structure, which makes keeping information synced correctly with the data source not as straight-forward as one would like. As mentioned previously, the DMS will copy the data from the database's logs and replicate this information in the s3 bucket. This data is saved in 2 different types of files:
- Full Load Files: these files have the full snapshot of the table, at the moment where the DMS process started.
- Incremental Files: these files contain all of the changes that occurred on the database from the moment the DMS process finished.
These files have different structures. Consider the example below of a simple starting table with some operations performed on it to show how the changes are replicated into the DMS. Here is the original table:
| ID | Name | Age |
|---|---|---|
| 1 | John | 29 |
| 2 | James | 31 |
Based on this table, the full load file named LOAD000001.csv will have the following content:
2,James,31
Now, let's add a couple of records to the original table as shown here:
(3,'Jenni',34)
, (4,'Jennifer',26);
The table now looks like this on the source.
| ID | Name | Age |
|---|---|---|
| 1 | John | 29 |
| 2 | James | 31 |
| 3 | Jenni | 34 |
| 4 | Jennifer | 26 |
After doing this operation, a new file will be created in the bucket. This file name will be the timestamp in which it was obtained by the DMS, such as this 20220216-113241894.csv. The contents:
I,4,Jennifer,26
The DMS will group the operations that happened within a time-span in one single file. This time-span is defined when configuring the task.
The DMS will group the operations that happened within a certain time-span in one single file. This time-span is defined when configuring the task.
Notice that we now have a new column. This column will be a single character column, that can have three possible values (I, U, or D) with each value specifying the operation done on that table (I for Insert, U for Update, and D for Delete).
We will now make some more changes:
(5, 'Daniel', 31)
, (6, 'Mary', 36)
, (7, 'May', 28);
UPDATE NAMES SET name = 'Jenny' WHERE id = 3;
UPDATE NAMES SET age = 41 WHERE id = 5;
DELETE FROM NAMES WHERE id = 2;
The table should now look like this on the source:
| ID | Name | Age |
|---|---|---|
| 1 | John | 29 |
| 3 | Jenny | 34 |
| 4 | Jennifer | 26 |
| 5 | Daniel | 41 |
| 6 | Mary | 36 |
| 7 | May | 28 |
In this case, we added 3 new records, updated 2 records (one immediately after inserting) and deleted another one. The next file will be 20220216-113657962.csv and will look like this:
I,6,Mary,36
I,7,May,28
U,5,Daniel,41
U,3,Jenny,32
D,2,James,31
Notice how in this case, we get multiple records for the same record, even if some of the changes were performed almost immediately. The combination of all these files, and getting the latest snapshot of a table is not a very straight-forward task because if we simply add records regardless of its operations, we would not be deleting data that should be deleted and we would have multiple records.
Solution
To solve this issue, we need to create a strategy to get the latest state of the table. To do so, a load from scratch will be to be performed in 2 steps for simplification purposes:
- Full load: this is a straight-forward load where we ONLY load the
LOAD000001.csv(the initial load file). This is a simple copy of the data into the target table. - Incremental load: this requires more work and it is performed in the following way:
- Load all new incremental files. This refers to the files that haven't been loaded. In this example, all of the files haven't been loaded yet, so they would all be loaded here.
- Rank the records from the newest (bottom) to the oldest (top). This is performed in Snowflake in two steps. The first step gets the row_number per each file, and the second creates a rank from the filename. The row_number is partitioned by the primary keys of the table in descending order to ensure we get the latest. Its important to note that since filenames are always a date, the ordering works appropriately for the rank.
The full query example of this solution is shown here:
-- Final query
select
op
, id
, name
, age
from
(
-- Second subquery
select
*
-- Rank based on primary keys and order bottom to top
-- by filename and row number.
, rank() over (
partition by id
order by metadata$filename desc, _dms_file_control_rownum desc
) as _dms_control_rank
from
(
-- First subquery
select
$1::varchar(1) as op
, $2::number as id
, $3::varchar as name
, $4::number as age
-- Row number to easily determine the latest row within the file
, metadata$file_row_number as _dms_file_control_rownum
, metadata$filename
from
@stage (pattern => '<pattern_to_table_folder_in_bucket>')
where
metadata$filename > '<last_incremental_file>'
-- 0 when making an incremental load for the first time
-- full path of the latest processed file when its not the first time
)
)
where
_dms_control_rank = 1
These queries in the solution are generated dynamically based on Snowflake'sinformation_schematable.
The first subquery result, is the following:
| Op | id | name | age | _dms_file_control_rownum | metadata$filename |
|---|---|---|---|---|---|
| I | 3 | Jenni | 34 | 1 | .../20220216-113241894.csv |
| I | 4 | Jennifer | 26 | 2 | .../20220216-113241894.csv |
| I | 5 | Daniel | 31 | 1 | .../20220216-113657962.csv |
| I | 6 | Mary | 36 | 2 | .../20220216-113657962.csv |
| I | 7 | May | 28 | 3 | .../20220216-113657962.csv |
| U | 5 | Daniel | 41 | 4 | .../20220216-113657962.csv |
| U | 4 | Jenny | 32 | 5 | .../20220216-113657962.csv |
| D | 2 | James | 31 | 6 | .../20220216-113657962.csv |
Note: The ".../" in the filename stands for the rest of the path omitted from here for simplification purposes.
This result as the rank:
| Op | id | name | age | _dms_file_control_rownum | metadata$filename | _dms_control_rank |
|---|---|---|---|---|---|---|
| I | 3 | Jenni | 34 | 1 | .../20220216-113241894.csv | 2 |
| I | 4 | Jennifer | 26 | 2 | .../20220216-113241894.csv | 1 |
| I | 5 | Daniel | 31 | 1 | .../20220216-113657962.csv | 2 |
| I | 6 | Mary | 36 | 2 | .../20220216-113657962.csv | 1 |
| I | 7 | May | 28 | 3 | .../20220216-113657962.csv | 1 |
| U | 5 | Daniel | 41 | 4 | .../20220216-113657962.csv | 1 |
| U | 3 | Jenny | 32 | 5 | .../20220216-113657962.csv | 1 |
| D | 2 | James | 31 | 6 | .../20220216-113657962.csv | 1 |
Notice how the dms_control_rank column now has values of 1 and 2. Depending on the number of changes to the same record, this number could be higher.
The final query, should look like this:
| Op | id | name | age | _dms_file_control_rownum | metadata$filename | _dms_control_rank |
|---|---|---|---|---|---|---|
| I | 4 | Jennifer | 26 | 2 | .../20220216-113241894.csv | 1 |
| I | 6 | Mary | 36 | 2 | .../20220216-113657962.csv | 1 |
| I | 7 | May | 28 | 3 | .../20220216-113657962.csv | 1 |
| U | 5 | Daniel | 41 | 4 | .../20220216-113657962.csv | 1 |
| U | 3 | Jenny | 32 | 5 | .../20220216-113657962.csv | 1 |
| D | 2 | James | 31 | 6 | .../20220216-113657962.csv | 1 |
Notice how only records with rank 1 are preserved, which in this case it would be the latest record activity.
After performing this query, we proceed to make a merge. This MERGE statement looks like this:
PUBLIC.NAMES AS T
USING
(
<final_query_shown_above>
) AS S
ON
T.ID = S.ID
WHEN MATCHED AND OP = 'D' THEN
DELETE
WHEN MATCHED AND OP <> 'D' THEN
UPDATE SET
T.ID = S.ID
, T.NAME = S.NAME
, T.AGE = S.AGE
WHEN NOT MATCHED AND OP <> 'D' THEN
INSERT (id,name,age)
VALUES (S.ID, S.NAME, S.AGE)
;
In the code above, the merge performs 3 operations:
WHEN MATCHED AND OP = 'D' THEN DELETE: If the query finds the record in the target table and the latest operation is a delete, the record will be deleted.WHEN MATCHED AND OP <> 'D' THEN UPDATE: If the query finds the record in the target table and the operation is not a delete (either 'I' or 'U'), the record will be updated. This is because an edge case could happen where the record already exists on the target, but is then deleted on the source while at the same time it was inserted again on the source. In this case, it shouldn't be inserted again. We should update it with the latest data.WHEN NOT MATCHED AND OP <> 'D' THEN INSERT: If the query doesn't find the record in the target table and the latest activity is not a delete, we should insert that new record in the table.
Note how there is not an action when the record is not matched and there was a delete operation. If that were the case, we shouldn't do anything to the target. This case would happen when a record is inserted and deleted before the update process on Snowflake starts running.
Configuration
AWS Configuration
Role configuration
The above example was created using a role with full permissions for DMS (to configure the DMS) and S3 (to write the data into buckets). Aside from this, a trusted relationship to dms (dms.amazonaws.com) must be added to the role for it to work properly. This allows the DMS service to assume the role to create the migration process. A database user with access to all tables will also be required.
General Resources
To start configuring the solution, create the following elements:
- S3 Bucket: Since we're going to replicate the data into s3, we need to create a bucket where this data is going to land.
- DMS Instance: This instance will need to be in a VPC (Virtual Private Cloud) that is allowed to communicate with the database's VPC. Both security groups should also have inbound rules between them to allow proper communication between the services.
Oracle Database Configuration
The DMS reads logs from the database to capture changes on the tables and save this information in a tabular format on the s3 bucket. For this to work some special configurations are required on the Oracle database. There are several ways to configure this, please refer to this guide to configure your database. It will give you more details and considerations to choose which option is best for your needs.
DMS Configuration
Each of the following will have to be created as the DMS is configured:
- Source Endpoint: A Source Endpoint is required for a Replication Task. This would be the Source Database that we want to replicate on s3.
- Target Endpoint: A Target Endpoint is also required for a Replication Task. This would be the Target Database (or s3 in this case) where we want the data to be replicated. In this section, you will configure the output format with options such as specify row delimiters, field delimiters, string enclosure, and partitioning among others. For this solution, however, partitioning is not supported.
- Replication Task: The final step is to create a Replication Task. This is the process that migrates the data, and you can choose a 1-time migration or an on-going replication. You can also configure which tables you want to include or exclude from the migration, and rename some columns and tables if desired. For example, all tables in a database have a tb_ prefix for tables, but that is not desired on Snowflake. You could remove that prefix in the Replication Task's configuration.
Note that the DMS can generate reports on data types, which can provide a good glimpse at the validity of data types. Here is an example of the summary:
{
"version": "0.0.1"
, "overall-test-result": "passed"
, "summary": {
"passed": [
{
"test-name":"table-with-lob-but-without-primary-key-or-unique-constraint"
, "test-result":"passed"
, "table-results-summary": {
"failed": 0
, "passed": 8
, "warning": 0
}
},
{
"test-name": "unsupported-data-types-in-source"
, "test-result":"passed"
, "table-results-summary": {
"failed": 0
, "passed": 8
, "warning": 0
}
}
]
, "failed": []
, "error": []
, "warning": []
, "cancelled":[]
}
}
Snowflake Configuration
Snowflake configuration is more straight-forward. Follow the steps below, but make sure to use a role that can run the ALTER TASK command or the automatic tasks process will not work:
- Create a database
- Create a warehouse
- Execute the sample script on our GitHub page in Snowflake. Some commands may fail when executing in batch, but they will work when executing individually. Make sure to modify the tasks to specify the warehouse and modify the
CONTROL_MIGRATION.DATA_MIGRATION_MAIN_TASKschedule to schedule the automatic process. To schedule tasks, please refer to this link. - Create a stage and file format. Here's an example:
-- File format creation. Make sure the parameters here are in line with the
-- parameters specified for the DMS target endpoint.
CREATE OR REPLACE FILE FORMAT control_migration.dms_test_csv
TYPE = CSV
RECORD_DELIMITER = '\n'
FIELD_DELIMITER = ','
FILE_EXTENSION = 'csv'
FIELD_OPTIONALLY_ENCLOSED_BY = '"'
;

-- Stage creation. This must use the file format created above.
CREATE OR REPLACE stage control_migration.dms_test_classic_models
URL ='s3://<bucket>/<database_folder>/'
CREDENTIALS = (aws_key_id='{AWS_KEY}' aws_secret_key='{AWS_SECRET}')
-- Instead of specifying credentials directly, you could also use a storage integration.
FILE_FORMAT = control_migration.dms_test_csv
;
- Execute
call control_migration.fill_dms_metadata('<stage_name>')to fill the metadata table. Make sure to include the schema in the stage_name. - Fill the primary keys for all tables on the
CONTROL_MIGRATION.DMS_METADATAtable. They can either be with lower or upper case and if there are multiple primary keys, make sure to separate them with commas. - Wait for the main task to run and after it finishes, your data should be loaded. If you don't have permissions to run the
ALTER TASKcommand, you can still run the process manually. To do so, execute the following commands:
-- The 1 flag indicates the procedure that it is a manual run.
CALL CONTROL_MIGRATION.PREPARE_EXECUTION_QUEUE(1);
CALL LOAD_TABLE(1);
Additional Considerations
There are some constraints with this solution:
General
Here are a few general considerations when executing this data migration strategy:- Schemas on Snowflake and the source database should be 100% identical, including column positions.
- Depending on the data types used, there may be some mismatches on the final migrated data (an example being some floating point numbers).
- DMS supports partitioning data on the s3 buckets. However, this is not currently supported on this solution.
- When a table fails to load, other tables for the same child task will not continue executing. This is intentional to see the error on the task history.
Binary types
When migrating data to BINARY data types in Snowflake, consider the following:- Snowflake's maximum size is 8MB (8192 KB).
- DMS allows 2 types of strategies for LOBs: limited and unlimited. However, s3 targets allow only limited. Unlimited is only allowed on Oracle and SQL Server DBMS engines as a source. Using the limited strategy, you choose the maximum KB allowed when configuring the DMS task.
- When working with binary columns, the maximum must be set <= 8192KB (8MB). Loads to these tables will fail if the binary files on s3 are greater than the maximum allowed by Snowflake.
- If a binary on the source is bigger than the maximum configured on the DMS task, the value for this binary will be truncated. This will lead to loading incomplete binaries into Snowflake, and they will not load correctly on the end application. An alternative to this would be to save the binaries to s3 or another file storage, and subsequently save the URL to that location on the database.
- The binary files are represented as a long string in the CSV files in a hex format. On Snowflake, the conversion is made automatically by the
COPY INTOcommand. It works the same on the incremental load since hex is the default binary format in Snowflake. - When you query a table in the worksheets, you will see this same hex representation on the UI. However, this string by itself can't be opened. To open it, you would need to convert this to bytes in your application or somewhere else. Here's an example using Python:
hex_representation = '<long_string_from_binary_column>'
file_bytes = bytes.fromhex(hex_representation)
with open("file.extension", "wb") as f:
f.write(file_bytes)
Use Cases
Here are a few use cases where migrating data as prescribed above would be beneficial:
Force full load on a table:call full_load('<full_s3_path_to_table>'); -- Example: call full_load('s3://dms_bucket/payments_database/payments/external_payments');
Execute incremental load:
call incremental_load('<full_s3_path_to_table>');
-- Example:
call incremental_load('s3://dms_bucket/payments_database/payments/external_payments');
Execute full manual load:
-- The 1 flag indicates it's a manual load.
call prepare_migration_queue(1);
call load_table(1);
Get execution schedule:
-- See history task for main task. In here you will be able to see the
-- next scheduled execution time. Unfortunately, tasks cannot be initiated
-- manually.
SELECT
*
FROM
TABLE(
information_schema.task_history(
task_name => 'DATA_MIGRATION_MAIN_TASK'
)
)
;
Force full reload on all tables:
update CONTROL_MIGRATION.DMS_METADATA set last_full_load_date = null;
call prepare_migration_queue(1);
call load_table(1);
See execution history for child tasks: this will allow you to look for errors in case tables haven't been loaded properly and next schedule times.
SELECT
*
FROM
TABLE(
information_schema.task_history(
-- Replace this string with DATA_MIGRATION_MAIN_TASK for main task
-- or DATA_MIGRATION_CHILE_TASK_<number> for children tasks
task_name => 'DATA_MIGRATION_CHILD_TASK_1'
)
)
;
And that's it! Thanks for reading this all the way to the end. Recall that there is support code for this article on our GitHub page, so check it out if you haven't already. Let us know how you're doing on your migration journey, and if you have additional suggestions for this guide.
And of course, if you're migrating more than just the data, but the schema, logic, and any procedural code you may have in PL/SQL, that's our specialty. Let's chat about it today.

