


by Mauricio Rojas, on Nov 7, 2022 1:44:32 PM
Complex data pipelines might require developers working with a Continuous Integration / Continuous Delivery (CI/CD) Strategy, so let's try some examples on how this can be achieved with Snowpark.
First, let's make sure we have our concepts clarified. These concepts are related to the usage of source control systems like git and devops tools like GitHub actions, Azure DevOps, or GitLab. You can read more about CI/CD tools and Snowflake here.
What is CI / CD?
CI/CD is the application of both Continuous Integration and more often continuous delivery.
By Continuous Integration, we refer to frequent merging of several small changes into a main branch.
By Continuous Delivery, we refer to the situation when teams produce software in short cycles with high speed and frequency. This allows for reliable software to be released at any time with a simple and repeatable deployment process.
Consider the following diagram:
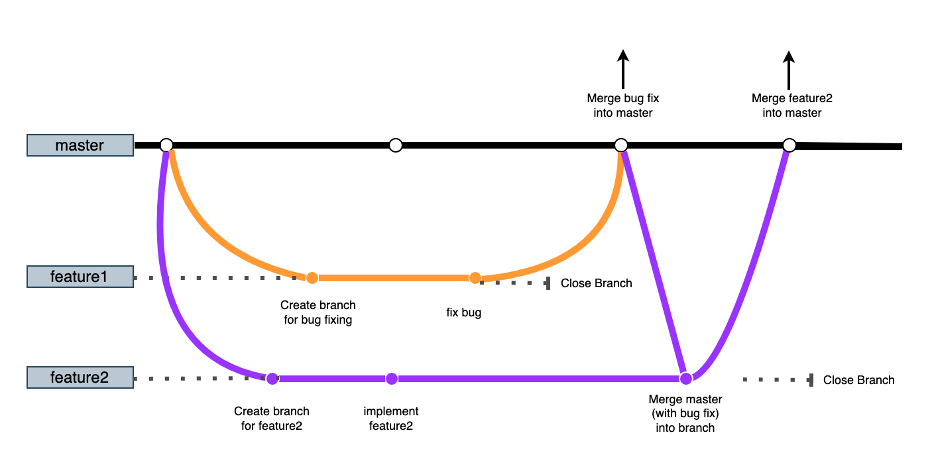
In this diagram, the horizontal lines represent git branches where master is the main branch. Development work is executed inside the "feature" branches.
When Developer1 needs to start working on a bug fix, she will create a branch and do the appropriate changes. When the code is ready, she will commit her changes. At that moment, tests need to be run to validate that those changes will not negatively affect the main branch.
Developer2 can start working at the same time on a feature. She will create a branch and implement her changes. If Developer1 finishes her feature first, Developer2 can rebase and continue working until she finishes her work.
CI/CD process in the Snowflake Platform
Snowflake provides several alternatives for quickly seeding a preproduction environment with data/code.
As a starting point, here are two common alternatives:
| When used | How it works | Copies Data | |
| Zero-Copying Cloning | Environments are on the same Snowflake account |
Metadata operation with pointers to the same data. No data movement. |
No |
| Secure Data Sharing | Environments are on separate Snowflake accounts |
Read-only database is shared from the production account to preproduction environments. |
As needed |
(Note that these two are not the only alternatives. Internal and External stages, for example, could be another great alternative.)
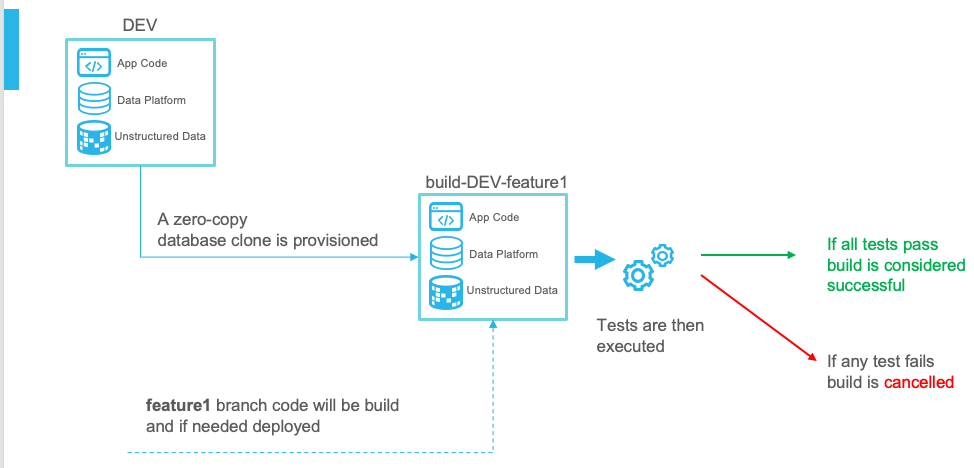
In general, whenever code is committed to a base environment, a zero-copy clone will be generated. This environment will have a unique name, as you can see in the image below.
Having two developers working at the same time is a challenge as they both will work in their own database, but that's why we want to deploy an effective CI/CD strategy.
Build runs can have their only lifecycles. They can start simultaneously or at different times:
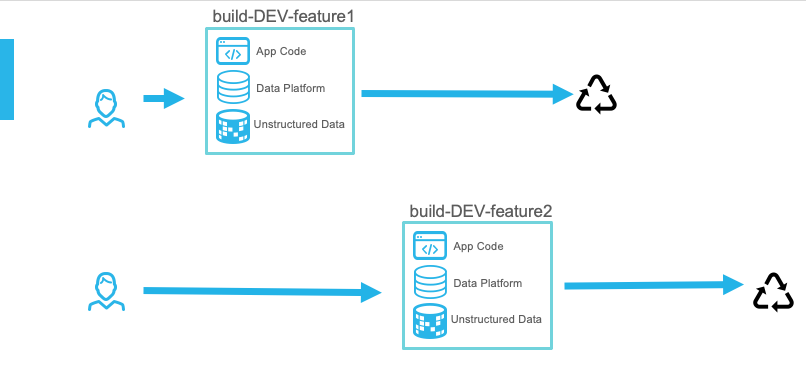
Regardless, they should not have an impact on each other.
A CI/CD Example
It many situations, it is easier to understand things with an actual example. We will use some Scala code that Eda Johnson shared in a similar article. This code has been published in our GitHub account at https://github.com/MobilizeNet/ci-cd-example-snowpark-scala.
This code is organized as follows:
- src/main/scala: the source code for the tasks
- src/test/scala: the test cases
- build.sbt and project/plugins.sbt are the project files
- .github/workflows/deploy.yml and publish.sh are the files used for DevOps, taking care of aspects like environment setting, code build, and database provisioning
This Scala code implements a couple of simple jobs using some simple operations. The code also utilizes a helper in Java to read and extract text from a User-Defined Function (UDF).
The build script compiles everything into what is called an Uber Jar or Fat Jar, which is a jar file that includes any dependencies. This is not the scenario for all cases, but it is a common scenario for some pipelines.
This code presents two test cases: one tests a simple function, and the other one performs a simple query using the Java UDF implemented in the uber jar.
Writing your DevOps script
These scripts can change depending on your tool of choice, but let's explore how this can be done with GitHub actions. (You can see the whole script on our GitHub page.)
But let's see in detail: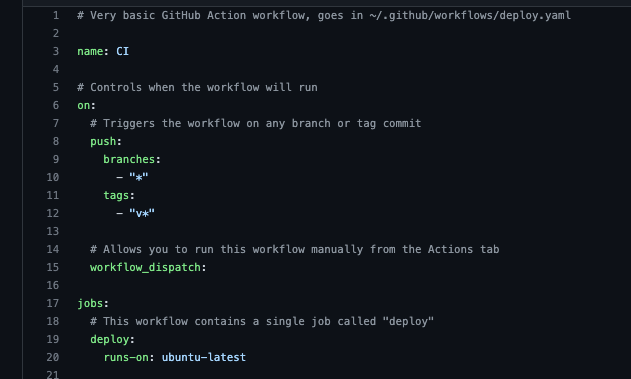
The first lines are mostly configuration. They establish when the process will be triggered and the docker image to use for the docker agent.
We then setup the "secrets" needed in order to connect to SF:
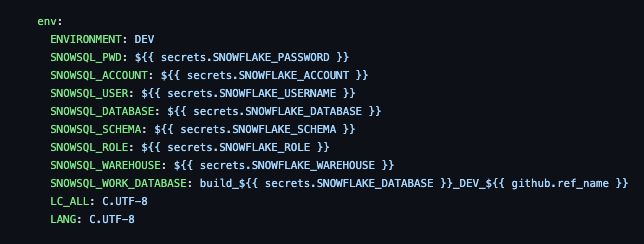
Notice the SNOWSQL_WORK_DATABASE variable. This is the name created for each build. In our case, it will be build_<databasebase>_DEV_<branch_name>
The next steps are to install the SnowSQL CLI and the tools needed to compile Scala.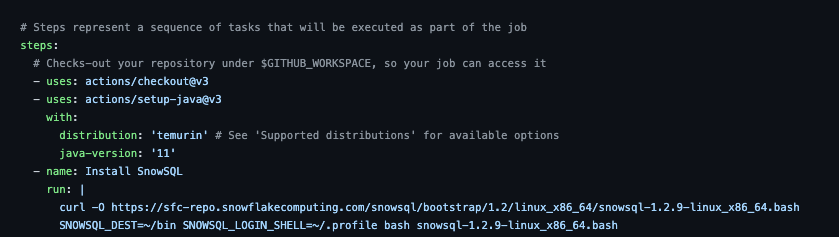
Before starting the process we provision a database:

Notice that we will leverage the zero-copy cloning mechanism. Then we switch the SNOWSQL_DATABASE environment variable to newly provisioned database.
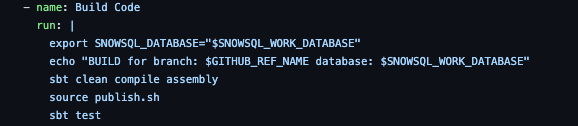
The sbt assembly command will compile everything and build a fat jar.
The publish.sh is mostly a simple script to copy the jar file into a stage. We then create a function pointing to that jar, and we are ready to run the test.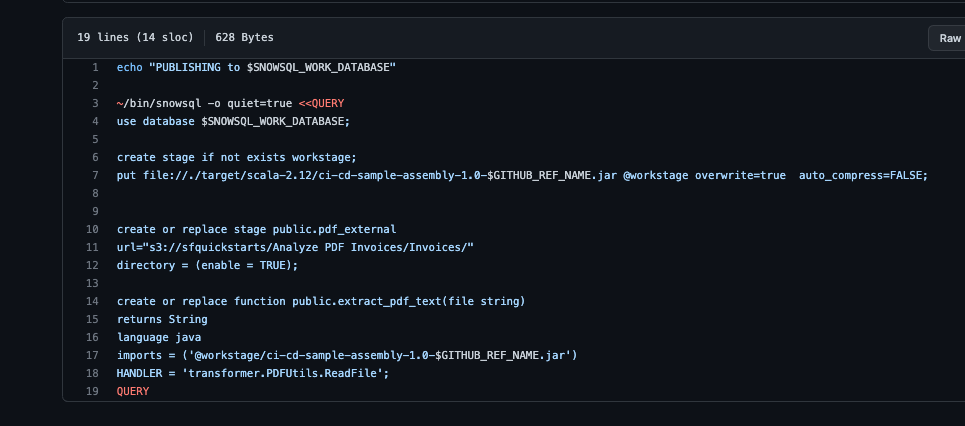
Our final step is the database that was previously created.

Final Thoughts
As you can see, you can have isolated workloads running at the same time with this approach.
There are several other elements related to setting up an CI/CD pipeline. For example, how to handle config files or sample data files. They can either be pre-published in the seed database or uploaded during the pipeline execution.
I hope that this post provides a little more insights on how this can be done. But if you have concerns or would like to know how to perform this with other tools like Azure DevOps, Jenkins, or Bamboo, let us know.
